Quilt trails are a phenomenon in several areas of the country. Western North Carolina has the Appalachian Quilt Trail.
Because we recently installed a meditation labyrinth in the small woods behind our house, I thought that a labyrinth design would be appropriate for our quilt square. I found a design I liked on the internet.
The first decision was size. The quilt squares were originally painted onto the sides of barns, so they were huge. Too big for my house. The one that Judy did for her house was 2x2, and she has decided that it is really too small. She's thinking about redoing it in a 3x3 size. But the area I was thinking about on our house is larger than Judy's, so I ended up making ours 4x4. This meant that I would have 4 of the squares on the labyrinth quilt to paint onto the plywood.
Walter and I went to Lowe's and bought a sheet of 4x8 plywood, which they cut in half for us. We took these pieces of plywood to my son Chase's house, because he had some sawhorses set up in a carport that would be perfect. I sanded the plywood, then primed both pieces with white exterior latex that he had on hand. (Chase later cut one of the halves into 4 2x2 pieces for future projects.)
The weather got real hot and I didn't want to work outside, so I brought one of the pieces home and lugged it upstairs to my studio. Then I started playing with colors. I did a couple of color studies, but didn't like them - the bold colors seemed too harsh to me. So I switched gears and went to more pastel shades.
Judy (and all of the directions I read) said to tape off the design to make the painting easier. Well, I guess my brain is haywire, because I couldn't keep the design straight in my mind! I ended up marking the entire piece into 2 inch squares and just started painting. I put on two coats of each color, then put on two coats of a water-based varnish.
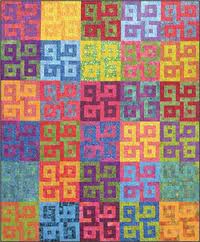
Here's the finished painting in my studio:

Can you tell that the lines are not perfect? Me, either. And I saved hours of taping time by doing it freehand.
Now for installation. We made a frame out of 1x2's that was slightly smaller than the painting. We found the center of the wall and screwed the frame to the side of the house.
 |
| finding the center |
 |
| attaching the frame to the side of the house |
Here they are screwing the painting to the frame. Walter predrilled all of the holes in the frame and in the painting so they wouldn't have to do heavy drilling from the top of the ladder. Very smart. That's Greg on the left ladder, Walter on the right ladder, and Sherman on the ground. All good guys.
 |
| screwing the painting to the frame |
And the final product!! I couldn't get a picture without a shadow at that time of day because of the overhang.

Now we have two quilt square houses on Morningside and my friend Debbie is working on hers. I'll post a picture of hers and of Judy's after my next trip.
No comments:
Post a Comment